

Spicy Yoghurt | Last updated: 20 March 2021 | HTML5 game tutorial
Collision detection and physics
Perform collision detection and react with physics, using JavaScript. Check for overlap between shapes, apply hitboxes and calculate new velocities. Make it more natural with object mass, gravity and restitution. By the end of this tutorial, you'll have a basic physics simulation running in your game.
Create some moving objects
If you already know how to create moving objects and are just interested in detecting collisions or physics, scroll down to the next section.
Before you can detect collisions between moving objects, you'll need some objects to begin with. In the previous tutorial you've learned how to move a single rectangle. Let's expand that logic and create a whole bunch of moving objects to fill your game. First, define a new type of game object. It's going to be a simple square.
            class Square extends GameObject
            {
                constructor (context, x, y, vx, vy){
                    super(context, x, y, vx, vy);

                    // Set default width and height
                    this.width = 50;
                    this.height = 50;
                }

                draw(){
                    // Draw a simple square
                    this.context.fillStyle = this.isColliding?'#ff8080':'#0099b0';
                    this.context.fillRect(this.x, this.y, this.width, this.height);
                }

                update(secondsPassed){
                    // Move with set velocity
                    this.x += this.vx * secondsPassed;
                    this.y += this.vy * secondsPassed;
                }
            }
This code might look a bit familiar. There is a draw() and a update() function, just like in the previous tutorial. Only this time it is baked into a separate square class. This way you can create many instances of a square and they all use the same logic to draw and update. You'll have the behavior and looks of the square in one, easy-to-manage, place.
The fillStyle in this new class is tweaked a bit. When this object is colliding, it will change color from blue to red. You'll see this in action when the first collisions are detected. For now, all squares will be blue.
All the squares inherit from the GameObject class. Every game object has a position and a speed. This enables you to easily create new types of game objects. They inherit the attributes and methods of the GameObject class. The square is just an example, but you could also make objects like enemies or players for your game this way.
    class GameObject
    {
        constructor (context, x, y, vx, vy){
            this.context = context;
            this.x = x;
            this.y = y;
            this.vx = vx;
            this.vy = vy;

            this.isColliding = false;
        }
    }
You can create a new instance of a class by using the new keyword. Make some squares to fill up your game world using this createWorld() function.
            let gameObjects;

            function createWorld(){
                gameObjects = [
                    new Square(context, 250, 50, 0, 50),
                    new Square(context, 250, 300, 0, -50),
                    new Square(context, 150, 0, 50, 50),
                    new Square(context, 250, 150, 50, 50),
                    new Square(context, 350, 75, -50, 50),
                    new Square(context, 300, 300, 50, -50)
                ];
            }
In the function, a bunch of squares are created. They are passed a position and speed as arguments. For now, this function is very static, but you could easily modify it to create more random squares or use some spawning algorithm.
Everything is in place to draw squares now. Update your game loop with the following code to loop over the newly created game objects and draw them on the screen.
            function gameLoop(timeStamp)
            {
                secondsPassed = (timeStamp - oldTimeStamp) / 1000;
                oldTimeStamp = timeStamp;

                // Loop over all game objects
                for (let i = 0; i < gameObjects.length; i++) {
                    gameObjects[i].update(secondsPassed);
                }

                clearCanvas();

                // Do the same to draw
                for (let i = 0; i < gameObjects.length; i++) {
                    gameObjects[i].draw();
                }

                window.requestAnimationFrame(gameLoop);
            }
As you can see, update() and draw() are no longer just called once per iteration. There are called once for every object on screen, every iteration.
This way the implementation of update() and draw() is object-specific. For the game loop it doesn't matter what kind of objects you are trying to draw, as long as they have an update() and draw() function.
For the square you are using, it will draw a simple square and move it in a straight line. But imagine other types of objects who have their own implementation of the two functions and have behavior and looks of their own. This game loop can handle it.
By the way, did you notice the "use strict" line missing in these new classes? That's because classes defined with the class keyword are strict by default. So, there is no need to specifically add "use strict" in these classes.
Take a look at the result:
You can see a bunch of rectangles getting drawn now. They each have their own starting position and move in a different direction. Just as defined in the createWorld() function. You can tweak the variables to create new types of squares.
Why do you need collision detection?
The squares may overlap in their movement, but that doesn't do much for now. It would be cool if the squares could interact and behave like actual solid objects and bounce off of each other. To make this happen, they would have to start with knowing they're colliding with one another. That's where collision detection comes in.
Collision detection is the art of detecting if two objects are colliding with each other, or did so between now and the last frame. It's the first step of implementing physics in your game.
Check for collisions between objects
The squares are moving on the screen, but there is no form of interaction jet. It's like they don't notice each other. Let's do something about that.
You are going to check for collisions between the moving objects. That requires you to loop over all objects and check if any of them overlaps with another. You'll need a nested for loop for this. Take a look at the example:
        function detectCollisions(){
            let obj1;
            let obj2;

            // Reset collision state of all objects
            for (let i = 0; i < gameObjects.length; i++) {
                gameObjects[i].isColliding = false;
            }

            // Start checking for collisions
            for (let i = 0; i < gameObjects.length; i++)
            {
                obj1 = gameObjects[i];
                for (let j = i + 1; j < gameObjects.length; j++)
                {
                    obj2 = gameObjects[j];

                    // Compare object1 with object2
                    if (rectIntersect(obj1.x, obj1.y, obj1.width, obj1.height, obj2.x, obj2.y, obj2.width, obj2.height)){
                        obj1.isColliding = true;
                        obj2.isColliding = true;
                    }
                }
            }
        }
All objects are checked for intersection with each other. The second for loop is a bit smarter and skips all previous checked items. You don't have to check objects twice. If they overlap the first time, they will too the second time. And of course, you don't have to check an object against itself, it would always overlap.
The function calls rectIntersect() for every combination of objects. When it finds a collision, it sets isColliding to true for both objects involved.
Remember the draw() function from the square? It will react to isColliding and draw the square in a different color. You can easily see when two objects overlap.
When do you check for collisions?
Just as with the draw() method, you want to update the position of all your game objects first, before checking for collisions. This way you'll always check for overlapping objects in their most recent state. If you do it the other way around and check for collisions before updating, you'll be checking for overlap on the state of the previous frame. You'll always run behind the facts.
Another option would be to do the collision check in the right order, but iterative. You would update object-a, check object-a for overlap with all other objects, update object-b, check object-b for overlap with all other objects, and so on. This is also an incorrect way of doing a collision check. Imagine object-a would be in collision with object-b after updating object-a's position. The system would detect a collision, even though it might not have been the case when object-b would have moved first too. That's why you'll always have to update all objects, before doing a collision check.
The correct order for your game loop is, update, collision check, clear canvas, draw. So, place the detectCollisions() function right after the loop for updating all game objects. Your total game loop now looks like this:

Collision detection between rectangles
The last piece of the puzzle is the rectIntersect() method. You can use it to check if two rectangles overlap. Checking for overlap between two axis-aligned (unrotated) rectangles is pretty simple and straight forward. You can probably come up with a method of checking for overlap on both axis by using the position and size of the rectangles. There are a lot of ways to do this, but the next method is very efficient:
    rectIntersect(x1, y1, w1, h1, x2, y2, w2, h2) {
        // Check x and y for overlap
        if (x2 > w1 + x1 || x1 > w2 + x2 || y2 > h1 + y1 || y1 > h2 + y2){
            return false;
        }
        return true;
    }
The code detects rectangles clearly overlapping halfway, but also works in the case of one small rectangle falling completely in a large one.
With this piece of code in place, you can finally check out the result. Here are the squares again, but this time they react upon each other.
After detecting a collision, the isColliding attribute is set to true. This makes the squares draw in red. You can clearly see when two objects overlap now.
Check if two circles overlap
You have a method now for checking collision between unrotated rectangles. But what if you want to do the same for circles? Well, that's not that hard either.
Imagine you have two circles, each with their own radius. They are placed with a distance between them. The circles would overlap if the distance is smaller than the sum of the radius of both circles. Since circles are round, this would even work when rotating the objects, they don't have to be axis-aligned.

Calculate distance between two points
You can calculate the distance between two points with the following formula:
c = sqrt((x1 - x2)2 + (y1 - y2)2)
If you think of Δx and Δy as two sides of a triangle, it basically applies the Pythagorean theorem to compute the size of the straight line between the points, c, the distance.
So, if this distance is smaller than- or equal to the radius of circle-a plus circle-b, the circles overlap or touch. This principle is used in the next function:
    circleIntersect(x1, y1, r1, x2, y2, r2) {

        // Calculate the distance between the two circles
        let squareDistance = (x1-x2)*(x1-x2) + (y1-y2)*(y1-y2);

        // When the distance is smaller or equal to the sum
        // of the two radius, the circles touch or overlap
        return squareDistance <= ((r1 + r2) * (r1 + r2))
    }
As you can see, the formula is tweaked a bit. Multiplication is much faster than getting the square root with Math.sqrt(), so the distance is calculated without getting the root and the sum of the radii is multiplied by itself. The outcome stays the same, but the performance is better.
Here is the same example as before, but with circles this time:
What about other shapes?
In this article, collision detection is only covered for two types of shapes. But what if your game objects consist of other, more complex, shapes or even images and you want to perform collision checks between them?
Well, for geometric shapes you can find other formulas to detect when two objects overlap. Here's a website who covers collision detection for a lot of different shapes. Overall, more complex shapes make collision detection more difficult. And for images you could apply pixel perfect collision detection. The downside of this is that it's a super CPU-heavy operation. Imagine having to match every pixel with one another, it would be a heck of a job.
That's why, to make things easier and put less stress on your system, developers often use hitboxes to detect collisions between complexly shaped game objects. It's a way to make collision detection easier and uses only basic geometric shapes, like the rectangles and circles covered in this tutorial. So, before you start building support for all kinds of complex shapes, try to think of a simple way to achieve the same effect, with basic shapes and hitboxes.
What are hitboxes and how do you use them?
Hitboxes are imaginary geometric shapes around game objects that are used to determine collision detection. Imagine you have a player figure. You won't check its arms and legs for collision but instead just check a big imaginary rectangle that's placed around the player.
You could simply use the function for rectangle collision detection, you've applied before, to check the hitboxes for collisions. It's far less CPU-intensive and makes supporting complex shapes in your game much easier. In some special cases, you could even use multiple hitboxes per game object. It would still outperform the pixel perfect solution.
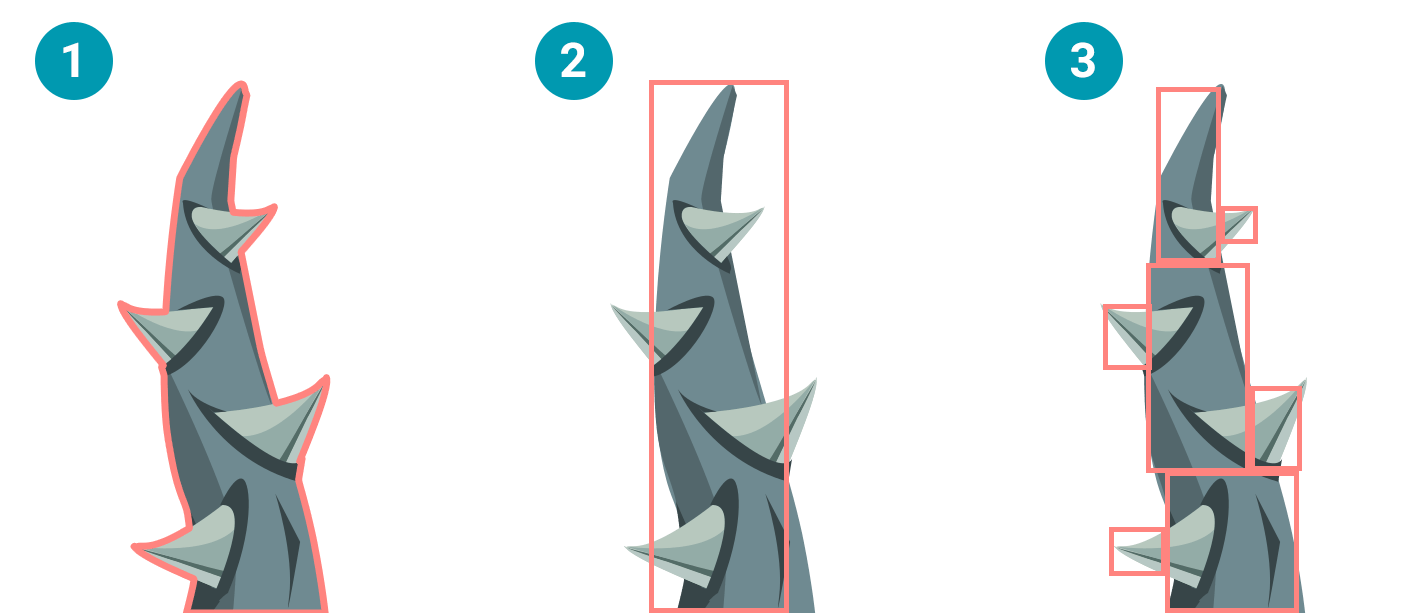
The image above demonstrates the different types of collision detection. They each have their own advantages and disadvantages:
- Pixel perfect - Super precise collision detection, but it requires some serious system resources. In most cases this is an overkill.
- Hitbox - Much better performance, but the collision detection can be pretty imprecise. In many game scenarios though, this doesn't really matter.
- Multiple hitboxes - Less efficient than a single hitbox but it still outperforms the pixel perfect variant. And you can support complex shapes. This is a nice option to use for important game objects that need some extra precision, like the player with limbs like mentioned before. You could make a hitbox for the core and separates ones for arms, legs and the head.
The example image is an actual game asset from the game Pixi Pop. In the game, the asset is used when precise collision detection is important and not too many other game tasks are running. That's why, in this case, the choice is made to work with multiple hitboxes. Just pick the option that suits your game scenario the best.
React to collisions with physics
You now have game objects who can detect a collision and change color. But wouldn't it be much cooler if the objects bounce off on each other, like real life objects? It's time to apply some physics to your game.
To change the velocity of the moving objects, you'll need to find out in what direction and with what speed the collision took place. You can then apply a change in velocity to the collided objects. The principles behind this work for both rectangles and circles.
Find the direction and speed of the collision
Imagine the next collision between two game objects. Both objects have a speed and direction of their own. They don't hit each other exactly straight on, but just happen to cause a collision while moving on their own course.
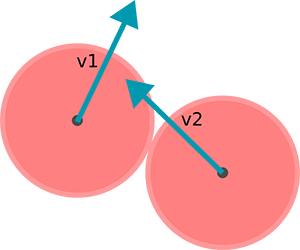
You'll want to find out the speed and direction of the collision so you can apply it to the velocity of the game objects. Start by creating a vector for the collision that took place. This vector is nothing more than the difference in x and y between the two colliding objects. You can see it as an arrow with length and direction. With vectors, the length is also called magnitude. Calculate the collision vector like this:
let vCollision = {x: obj2.x - obj1.x, y: obj2.y - obj1.y};
In the example of the two game objects, the collision vector will look like this:
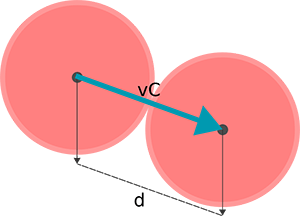
The magnitude in this case, is equal to the distance between the two colliding objects. It has nothing to do with speed yet. But you can use the direction of the vector. To get to the direction, you need to take away the factor of the distance.
Let's first calculate the distance of the collision vector. You can use the same formula as you did before to calculate the distance between two colliding circles. So the code becomes:
let distance = Math.sqrt((obj2.x-obj1.x)*(obj2.x-obj1.x) + (obj2.y-obj1.y)*(obj2.y-obj1.y));
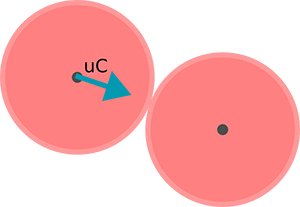
Now use the distance to compute a normalized collision vector. You basically remove the distance as a factor in the collision vector, so you are left with just a direction. The collision norm is in the same direction as the collision vector, only with norm/magnitude/length 1. You also call this an unit vector. You can calculate the normalized vector like this:
let vCollisionNorm = {x: vCollision.x / distance, y: vCollision.y / distance};
This will basically leave you with just a direction for the collision. In the example of the two game objects, it will look like this:
You now have a direction. This is the direction in which the collision took place. All you need now is the collision speed and you'll be able to calculate how the velocity of the objects will be affected by the collision. You can calculate the speed of the collision like this:
            let vRelativeVelocity = {x: obj1.vx - obj2.vx, y: obj1.vy - obj2.vy};
            let speed = vRelativeVelocity.x * vCollisionNorm.x + vRelativeVelocity.y * vCollisionNorm.y;
As first row in the example code, another vector is created with the relative velocity of the objects. It's like the vector you would have left if you would make one of the game objects stationary. (You can read more about relative velocities here.) It's easier to understand in the next example. The vectors of the two game objects are displayed on top of each other, so you can visualize the relative velocity vector:
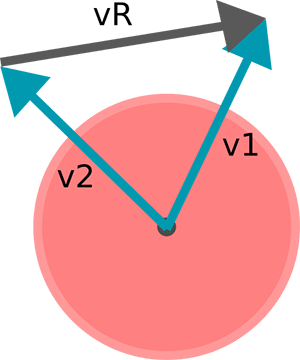
Together with the collision normal, the relative velocity vector is used to calculate the dot product of the two vectors. The dot product is the length of the projection of relative velocity on the collision normal. Or in other words, the length of the velocity vector when it's in the direction of the collision. Learn more about dot products here. Learn more about vector operations here.
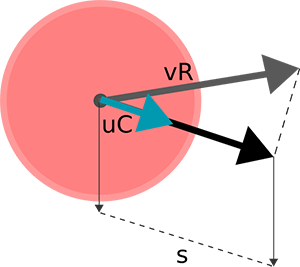
The dot product is equal to the speed of the collision. So that's it, you've got a speed and direction of the collision between the two objects. You can apply this to the velocity of the game objects and make them bounce off of each other.
Change velocity of the moving objects
The speed of the collision can be positive or negative. When it's positive, the objects are moving toward each other. When it's negative, they move away. When objects move away, there is no need to perform any further action. They will move out of collision on their own.
        if (speed < 0){
            break;
        }
For the other case, when objects are moving toward each other, apply the speed in the direction of the collision. Both objects get the same change in velocity from the collision. Subtract or add the velocity to the velocity of the two collided objects.
        obj1.vx -= (speed * vCollisionNorm.x);
        obj1.vy -= (speed * vCollisionNorm.y);
        obj2.vx += (speed * vCollisionNorm.x);
        obj2.vy += (speed * vCollisionNorm.y);
That's it, by applying speed to direction you calculate the collision velocity. And that velocity is now processed in the velocity of the objects involved. Your game objects should bounce in a natural looking way.
Now take a look at the result:
Add mass, impulse and momentum
If you like, you can apply physics even further and take mass into the equation by calculating the collision impulse from the speed. Use the impulse to calculate momentum. Heavy objects will push light ones aside.
    let impulse = 2 * speed / (obj1.mass + obj2.mass);
    obj1.vx -= (impulse * obj2.mass * vCollisionNorm.x);
    obj1.vy -= (impulse * obj2.mass * vCollisionNorm.y);
    obj2.vx += (impulse * obj1.mass * vCollisionNorm.x);
    obj2.vy += (impulse * obj1.mass * vCollisionNorm.y);
If you have two objects with a mass of 1, the impulse is just equal to the speed. In other cases, you basically split the speed into many small parts. Heavy objects receive a few of those parts as momentum, light objects a lot. This makes the lighter objects more effected by the collision.
Don't forget to add mass to your game objects. The GameObject class is a good place to store mass. You can modify the createWorld() function to pass mass as an argument via the Circle and Rectangle classes.
Here's an example that's modified to create a lot of small circles and two larger ones. (The spawning algorithm isn't very smart so the objects might start in collision)
In the example, the big circles have a very large mass compared to the smaller circles. They push everything out of their way. But when the two heavy objects hit each other, they bounce off too.
Get the heading of the objects
The objects are constantly colliding and changing direction. For a game it would be helpful to know which direction exactly, so you can add rotated textures or build game logic based on it. Let's calculate it!
You can easily get the angle of the objects by using Math.atan2() on the x- and y velocities. The result is in radians, use Math.PI to translate it to degrees. Here's an example which calculates the angle in your update() function:
        update(secondsPassed){
            // Move with set velocity
            this.x += this.vx * secondsPassed;
            this.y += this.vy * secondsPassed;

            // Calculate the angle (vy before vx)
            let radians = Math.atan2(this.vy, this.vx);

            // Convert to degrees
            let degrees = 180 * radians / Math.PI;
        }
You can use the angle later in your game, to draw rotated images. This will be further explained in the next tutorial of this series.
For now, rotating isn't so interesting since the circle is a plain shape. You wouldn't notice a change in rotation. So, here's a simple implementation that shows the movement direction of the objects with a little line. The higher the speed, the longer the line. This basically represents the heading vector of the object. You can easily add this visualisation to your drawing function.
        draw() {
            // Other drawing operations
            // ...

            // Draw heading vector
            this.context.beginPath();
            this.context.moveTo(this.x, this.y);
            this.context.lineTo(this.x + this.vx, this.y + this.vy);
            this.context.stroke();
        }
Add the effects of gravity
The examples shown in this tutorial contain just a basic implementation of physics. You could add more aspects to your game to make it look even more natural. Things like gravity or restitution aren't too hard to implement. Let's start right now with adding gravity to your simulation.
For gravity, simply adjust the y-speed of your objects with the gravitational acceleration. On Earth it's about 9.81 meter per second per second. You can apply it inside the update() function of your game objects. Every second, g is added to the y-speed, this will make the object fall faster and faster.
        // Set gravitational acceleration
        const g = 9.81;

        update(secondsPassed){
            // Apply acceleration
            this.vy += g * secondsPassed;

            // Move with set velocity
            this.x += this.vx * secondsPassed;
            this.y += this.vy * secondsPassed;
        }
Update the velocity before you update the position. This will give more accurate results, as explained in this article about integrating the equations of motion. This type of integration is called Semi-implicit Euler.
Confine the movement space of the objects
For the effects of gravity to show nicely, you can limit the movement of your objects to the edges of the canvas. It will act like a closed box on which the objects can bounce off.
You can make it happen with a simple adjustment. Execute the next function right after your main collision detection function, so object-edge collisions are checked together with the object-object collisions.
        // Define the edges of the canvas
        const canvasWidth = 750;
        const canvasHeight = 400;

        // Set a restitution, a lower value will lose more energy when colliding
        const restitution = 0.90;

        function detectEdgeCollisions()
        {
            let obj;
            for (let i = 0; i < gameObjects.length; i++)
            {
                obj = gameObjects[i];

                // Check for left and right
                if (obj.x < obj.radius){
                    obj.vx = Math.abs(obj.vx) * restitution;
                    obj.x = obj.radius;
                }else if (obj.x > canvasWidth - obj.radius){
                    obj.vx = -Math.abs(obj.vx) * restitution;
                    obj.x = canvasWidth - obj.radius;
                }

                // Check for bottom and top
                if (obj.y < obj.radius){
                    obj.vy = Math.abs(obj.vy) * restitution;
                    obj.y = obj.radius;
                } else if (obj.y > canvasHeight - obj.radius){
                    obj.vy = -Math.abs(obj.vy) * restitution;
                    obj.y = canvasHeight - obj.radius;
                }
            }
       }
It basically checks for objects positioned beyond the edges and resets their position to fall within the box again. The speed of the objects is then flipped to move perpendicular to the wall.
It's a very basic implementation and only works this way because the edges of the canvas are predefined straight lines. You could do the same with a circle-line collision and set-up dynamic lines, but that would be much more complicated than this quick example.
Absorb impact by implementing restitution
If you would run the code up till now, you'll see the game objects will never get in a resting state. They will keep bouncing and bouncing and never lose any energy. To counter this, you can implement restitution.
Restitution basically describes how much energy is left after each collision. It has an effect on the bounciness of objects. The ratio between the starting and ending velocity after a bounce is called coefficient of restitution, or COR.
- Objects with a COR of 0 would absorb all energy on impact, like a bag of sand hitting the floor.
- Objects with a COR of 1 would have perfect elasticity, like a super bouncy bouncing ball.
- Objects with a COR > 1 are completely fictional and would add extra energy after each collision.
In the previous coding example, the COR is being applied to the collision with the edges. This will make the objects lose just a little bit of energy after each bounce. It will make the simulation much more realistic, leaving it out would let the objects bounce on forever.
To complete the implementation of the restitution, you'll need to apply it to the objects involved in an object-object collision as well. Just multiply their speed by the COR (just restitution in the code). Every collision will now use up a bit of energy.
When two objects collide with a different restitution setting, like for instance when a bouncing ball hits a bag of sand, the lowest restitution will count. In this case, neither the bouncing ball or the bag of sand will bounce, they both inherit the restitution of the bag.
        detectCollisions() {
            // ...
            // Calculate speed of the detected collision
            let speed = vRelativeVelocity.x * vecCollisionNorm.x + vRelativeVelocity.y * vecCollisionNorm.y;

            // Apply restitution to the speed
            speed *= Math.min(obj1.restitution, obj2.restitution);
            // ...
        }
The next live canvas example shows gravity, restitution and boxing being applied.
You can easily tweak the variables to create different scenarios. Set a high gravity to simulate being on a foreign planet or lower the restitution to make the objects act like bags of sand who absorb all impacts.
Ways of improving performance
You might not really notice it right now, but with many game objects on screen at once or with more complex shapes, the collision detection and -reaction can put some serious stress on your system. Here are some tips that might help to improve performance. They might seem obvious, but when a game gets more complex it's easy to overlook some of these concepts.
- Only compare objects that are close enough to have a possible collision. You could use a grid system or only detect collision when objects enter a certain radius. This is called splitting the collision detection into a broad phase and narrow phase. Learn more about broad phase collision detection here.
- Keep your object pool clean. Clean up objects when they are out of view or destroyed in-game.
- Exclude background/stationary objects. Some objects won't ever react to collisions, so don't include them in the iteration.
- Use hitboxes. As explained before, hitboxes are a great way of optimizing collision detection and simplify complex shapes.
- Adjust the implementation of collision detection and physics to fit your game. You don't need a full physics engine when all you want to do is to make tic-tac-toe. That's a bit of a drastic example, but you get the point. Strip your logic to only support what is needed.
Handle fast-moving objects
One final note about collision detection. The above example detects collisions by checking if two objects overlap. This is a good solution in many cases. But it won't work when your objects move at great speed. When the speed is higher than the size of your smallest object, objects have a chance of skipping the collision check. They pass through each other.
Imagine you check for a collision between a bullet and an enemy in your game. The first frame the bullet is before the enemy. There is no overlap, so the objects didn't hit. The next frame the bullet moved so fast, it is now behind your enemy. There still is no overlap, so no collision. But the bullet did pass right through the enemy and there should've been a hit.
Here's an image to demonstrate the situation of a fast-moving object, like a bullet, that never has any real overlap with another game object but should've caused a collision:
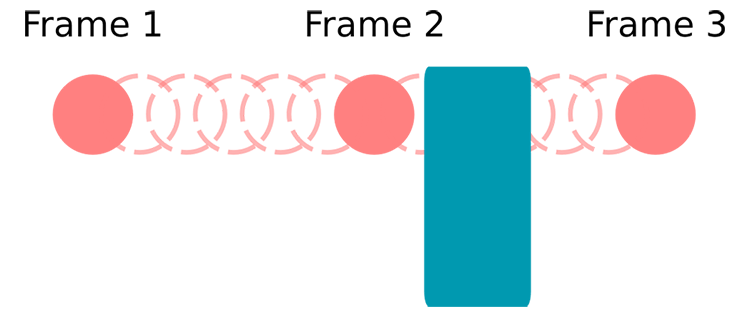
You need another approach for this kind of situation. The simplest way is to limit the speed of your game objects. In short, make sure the speed is never larger than the smallest game object, so it can't pass through. For many types of games this is a great solution and it requires minimal effort.
The other solution is to perform collision detection with the projected path instead of the current position of the two objects. Try to visualize the path of a bullet as a line. The length of the line is equal to the distance the bullet will travel. Now you can use a line-to-rectangle or line-to-circle collision check to find out if the bullet will hit another object. For large bullets, you could use a rectangle instead of a line.
This is a simplified solution. You will probably run into other problems along the way, like finding the point of impact or determining which object of a greater set is hit first. But the steps mentioned here might help to point you in the right direction. For now, this is all on fast-moving objects for this tutorial.
What's next?
That's all for now on collisions and physics. Your collision check is in place and your game objects are now interacting with each other in a semi-natural way. If you have any comments or questions, feel free to post them in the comment section below. You can download the example code here.

Spicy Yoghurt is here to help you create your own games and inspire you. Building the website takes a lot of spare time and coffee.
We supply the spare time and you can support us with a cup of coffee!
In the next step of the tutorial, you'll learn how to use images in your game and create sprite animations.
Leave a comment